
Introduction to PyTorch-Ignite
This post is a general introduction of PyTorch-Ignite. It intends to give a brief but illustrative overview of what PyTorch-Ignite can offer for Deep Learning enthusiasts, professionals and researchers. Following the same philosophy as PyTorch, PyTorch-Ignite aims to keep it simple, flexible and extensible but performant and scalable.
Throughout this tutorial, we will introduce the basic concepts of PyTorch-Ignite with the training and evaluation of a MNIST classifier as a beginner application case. We also assume that the reader is familiar with PyTorch.
Crossposted from https://labs.quansight.org/blog/2020/09/pytorch-ignite/
PyTorch-Ignite: What and Why ?
PyTorch-Ignite is a high-level library to help with training and evaluating neural networks in PyTorch flexibly and transparently.
PyTorch-Ignite is designed to be at the crossroads of high-level Plug & Play features and under-the-hood expansion possibilities. PyTorch-Ignite aims to improve the deep learning community’s technical skills by promoting best practices. Things are not hidden behind a divine tool that does everything, but remain within the reach of users.
PyTorch-Ignite takes a “Do-It-Yourself” approach as research is unpredictable and it is important to capture its requirements without blocking things.
🔥 PyTorch + Ignite 🔥
PyTorch-Ignite wraps native PyTorch abstractions such as Modules, Optimizers, and DataLoaders in thin abstractions which allow your models to be separated from their training framework completely. This is achieved by a way of inverting control using an abstraction known as the Engine. The Engine is responsible for running an arbitrary function - typically a training or evaluation function - and emitting events along the way.
A built-in event system represented by the Events class ensures Engine’s flexibility, thus facilitating interaction on each step of the run.
With this approach users can completely customize the flow of events during the run.
In summary, PyTorch-Ignite is
- Extremely simple engine and event system = Training loop abstraction
- Out-of-the-box metrics to easily evaluate models
- Built-in handlers to compose training pipelines, save artifacts and log parameters and metrics
Additional benefits of using PyTorch-Ignite are
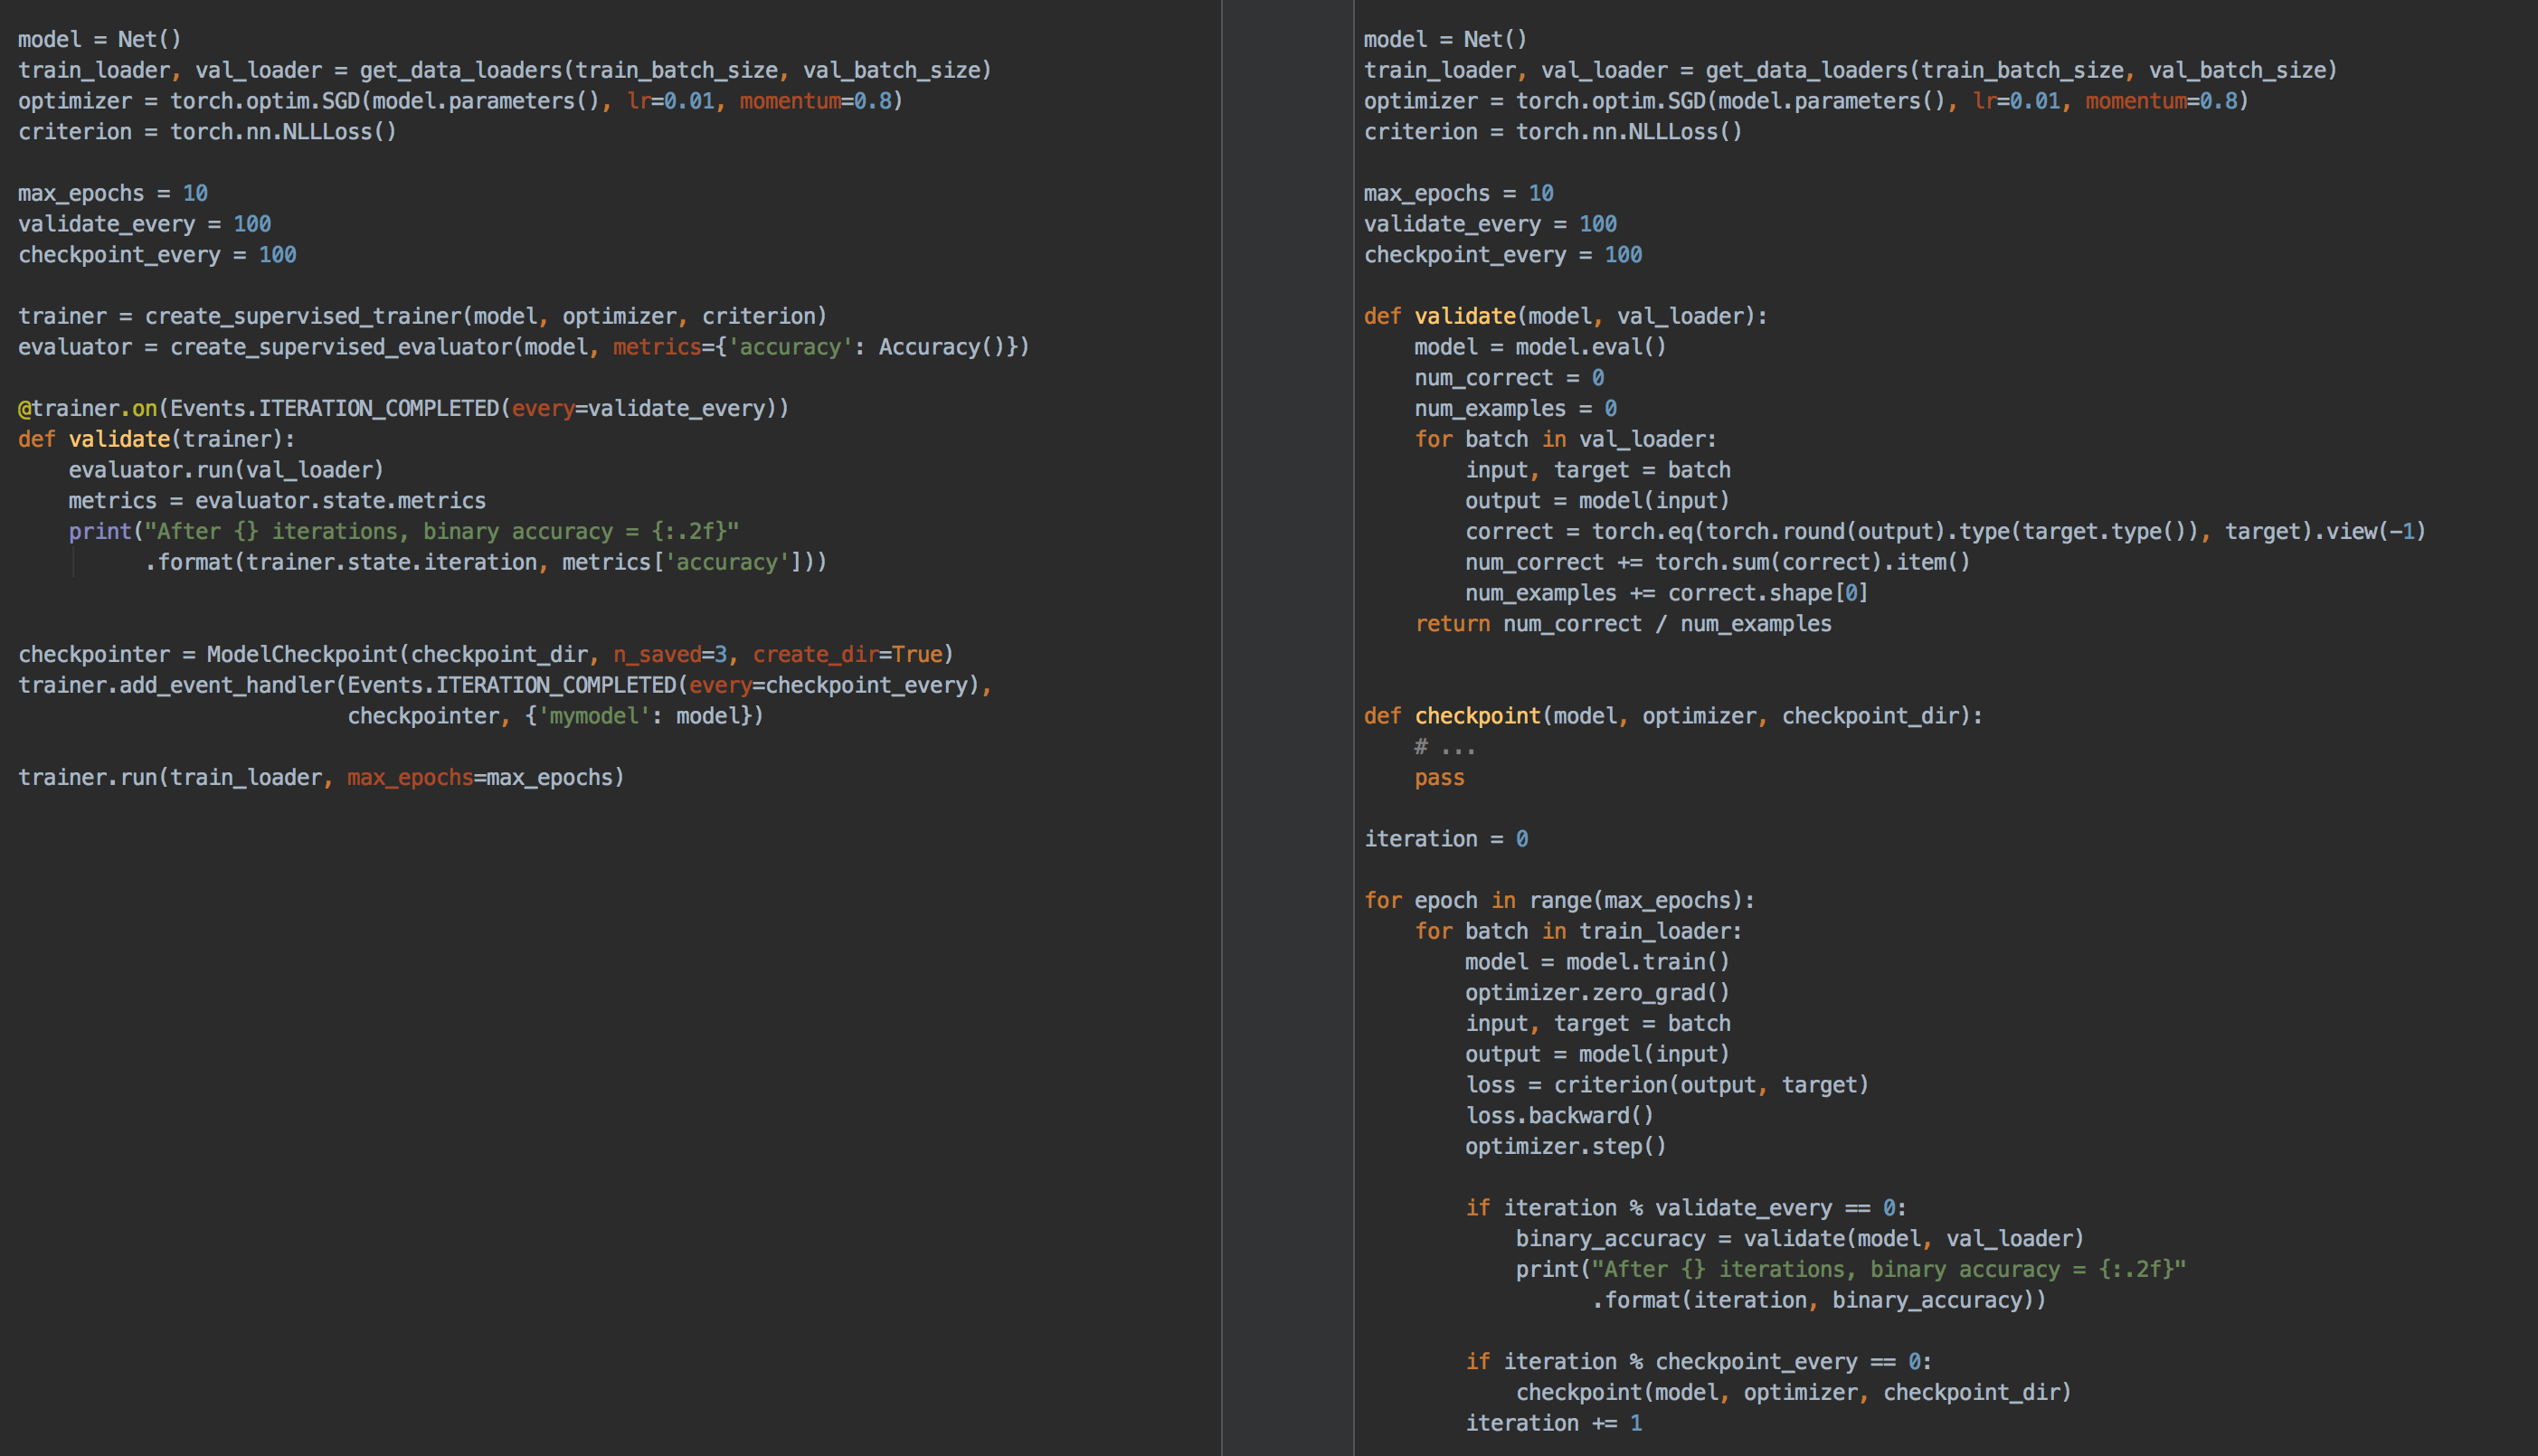
- Less code than pure PyTorch while ensuring maximum control and simplicity
- More modular code
| PyTorch-Ignite | PyTorch |
|---|
About the design of PyTorch-Ignite
PyTorch-Ignite allows you to compose your application without being focused on a super multi-purpose object, but rather on weakly coupled components allowing advanced customization.
The design of the library is guided by:
- Anticipating new software or use-cases to come in in the future without centralizing everything in a single class.
- Avoiding configurations with a ton of parameters that are complicated to manage and maintain.
- Providing tools targeted to maximizing cohesion and minimizing coupling.
- Keeping it simple.
Quick-start example
In this section we will use PyTorch-Ignite to build and train a classifier of the well-known MNIST dataset. This simple example will introduce the principal concepts behind PyTorch-Ignite.
For additional information and details about the API, please, refer to the project’s documentation.
pip install pytorch-ignite
Collecting pytorch-ignite
[?25l Downloading https://files.pythonhosted.org/packages/c0/8e/08569347023611e40e62a14162024ca6238d42cb528b2302f84d662a2033/pytorch_ignite-0.4.1-py2.py3-none-any.whl (166kB)
[K |████████████████████████████████| 174kB 8.4MB/s eta 0:00:01
[?25hRequirement already satisfied: torch<2,>=1.3 in /usr/local/lib/python3.6/dist-packages (from pytorch-ignite) (1.6.0+cu101)
Requirement already satisfied: future in /usr/local/lib/python3.6/dist-packages (from torch<2,>=1.3->pytorch-ignite) (0.16.0)
Requirement already satisfied: numpy in /usr/local/lib/python3.6/dist-packages (from torch<2,>=1.3->pytorch-ignite) (1.18.5)
Installing collected packages: pytorch-ignite
Successfully installed pytorch-ignite-0.4.1
Common PyTorch code
First, we define our model, training and validation datasets, optimizer and loss function:
import os
import torch
import torch.nn as nn
import torch.nn.functional as F
from torch.optim import SGD
from torch.utils.data import DataLoader

from torchvision.transforms import Compose, ToTensor, Normalize
from torchvision.datasets import MNIST

# transform to normalize the data
transform = Compose([ToTensor(), Normalize((0.1307,), (0.3081,))])

# Download and load the training data
trainset = MNIST("data", download=True, train=True, transform=transform)
train_loader = DataLoader(trainset, batch_size=128, shuffle=True)

# Download and load the test data
validationset = MNIST("data", train=False, transform=transform)
val_loader = DataLoader(validationset, batch_size=256, shuffle=False)

# Define a class of CNN model (as you want)
class Net(nn.Module):
    def __init__(self):
        super(Net, self).__init__()
        self.conv1 = nn.Conv2d(1, 10, kernel_size=5)
        self.conv2 = nn.Conv2d(10, 20, kernel_size=5)
        self.conv2_drop = nn.Dropout2d()
        self.fc1 = nn.Linear(320, 50)
        self.fc2 = nn.Linear(50, 10)

    def forward(self, x):
        x = F.relu(F.max_pool2d(self.conv1(x), 2))
        x = F.relu(F.max_pool2d(self.conv2_drop(self.conv2(x)), 2))
        x = x.view(-1, 320)
        x = F.relu(self.fc1(x))
        x = F.dropout(x, training=self.training)
        x = self.fc2(x)
        return F.log_softmax(x, dim=-1)

device = "cuda"

# Define a model on move it on CUDA device
model = Net().to(device)

# Define a NLL loss
criterion = nn.NLLLoss()

# Define a SGD optimizer
optimizer = SGD(model.parameters(), lr=0.01, momentum=0.8)
The above code is pure PyTorch and is typically user-defined and is required for any pipeline.
Trainer and evaluator’s setup
model’s trainer is an engine that loops multiple times over the training dataset and updates model parameters. Let’s see how we define such a trainer using PyTorch-Ignite. To do this, PyTorch-Ignite introduces the generic class
Engine that is an abstraction that loops over the provided data, executes a processing function and returns a result. The only argument needed to construct the trainer is a train_step function.
from ignite.engine import Engine

def train_step(engine, batch):
    x, y = batch
    x = x.to(device)
    y = y.to(device)

    model.train()
    y_pred = model(x)
    loss = criterion(y_pred, y)

    optimizer.zero_grad()
    loss.backward()
    optimizer.step()

    return loss

# Define a trainer engine
trainer = Engine(train_step)
Please note that train_step function must accept engine and batch arguments. In the example above, engine is not used inside train_step, but we can easily imagine a use-case where we would like to fetch certain information like current iteration, epoch or custom variables from the engine.
Similarly, model evaluation can be done with an engine that runs a single time over the validation dataset and computes metrics.
def validation_step(engine, batch):
    model.eval()
    with torch.no_grad():
        x, y = batch[0], batch[1]
        x = x.to("cuda")
        y = y.to("cuda")

        y_pred = model(x)

        return y_pred, y

evaluator = Engine(validation_step)
This allows the construction of training logic from the simplest to the most complicated scenarios.
The type of output of the process functions (i.e. loss or y_pred, y in the above examples) is not restricted. These functions can return everything the user wants. Output is set to an engine’s internal object engine.state.output and can be used further for any type of processing.
Events and Handers
To improve the engine’s flexibility, a configurable event system is introduced to facilitate the interaction on each step of the run. Namely, Engine allows to add handlers on various
Events that are triggered during the run. When an event is triggered, attached handlers (named functions, lambdas, class functions) are executed. Here is a schema for when built-in events are triggered by default:
fire_event(Events.STARTED)
while epoch < max_epochs:
    fire_event(Events.EPOCH_STARTED)
    # run once on data
    for batch in data:
        fire_event(Events.ITERATION_STARTED)

        output = process_function(batch)

        fire_event(Events.ITERATION_COMPLETED)
    fire_event(Events.EPOCH_COMPLETED)
fire_event(Events.COMPLETED)
Note that each engine (i.e. trainer and evaluator) has its own event system which allows to define its own engine’s process logic.
Using Events and handlers, it is possible to completely customize the engine’s runs in a very intuitive way:
from ignite.engine import Events

# Show a message when the training begins
@trainer.on(Events.STARTED)
def start_message():
    print("Start training!")

# Handler can be want you want, here a lambda !
trainer.add_event_handler(
    Events.COMPLETED,
    lambda _: print("Training completed!")
)

# Run evaluator on val_loader every trainer's epoch completed
@trainer.on(Events.EPOCH_COMPLETED)
def run_validation():
    evaluator.run(val_loader)
In the code above, the run_validation function is attached to the trainer and will be triggered at each completed epoch to launch model’s validation with evaluator. This shows that engines can be embedded to create complex pipelines.
Handlers offer unparalleled flexibility compared to callbacks as they can be any function: e.g., a lambda, a simple function, a class method, etc. Thus, we do not require to inherit from an interface and override its abstract methods which could unnecessarily bulk up your code and its complexity.
The possibilities of customization are endless as PyTorch-Ignite allows you to get hold of your application workflow. As mentioned before, there is no magic nor fully automatated things in PyTorch-Ignite.
Model evaluation metrics
Metrics are another nice example of what the handlers for PyTorch-Ignite are and how to use them. In our example, we use the built-in metrics Accuracy and Loss.
from ignite.metrics import Accuracy, Loss

# Accuracy and loss metrics are defined
val_metrics = {
  "accuracy": Accuracy(),
  "loss": Loss(criterion)
}

# Attach metrics to the evaluator
for name, metric in val_metrics.items():
    metric.attach(evaluator, name)
PyTorch-Ignite metrics can be elegantly combined with each other.
from ignite.metrics import Precision, Recall

# Build F1 score
precision = Precision(average=False)
recall = Recall(average=False)
F1 = (precision * recall * 2 / (precision + recall)).mean()

# and attach it to evaluator
F1.attach(evaluator, "f1")
To make general things even easier,
helper methods are available for the creation of a supervised Engine as above. Thus, let’s define another evaluator applied to the training dataset in this way.
from ignite.engine import create_supervised_evaluator

# Define another evaluator with default validation function and attach metrics
train_evaluator = create_supervised_evaluator(model, metrics=val_metrics, device="cuda")

# Run train_evaluator on train_loader every trainer's epoch completed
@trainer.on(Events.EPOCH_COMPLETED)
def run_train_validation():
    train_evaluator.run(train_loader)
The reason why we want to have two separate evaluators (evaluator and train_evaluator) is that they can have different attached handlers and logic to perform. For example, if we would like store the best model defined by the validation metric value, this role is delegated to evaluator which computes metrics over the validation dataset.
Common training handlers
From now on, we have trainer which will call evaluators evaluator and train_evaluator at every completed epoch. Thus, each evaluator will run and compute corresponding metrics. In addition, it would be very helpful to have a display of the results that shows those metrics.
Using the customization potential of the engine’s system, we can add simple handlers for this logging purpose:
@evaluator.on(Events.COMPLETED)
def log_validation_results():
    metrics = evaluator.state.metrics
    print("Validation Results - Epoch: {}  Avg accuracy: {:.2f} Avg loss: {:.2f} Avg F1: {:.2f}"
          .format(trainer.state.epoch, metrics["accuracy"], metrics["loss"], metrics["f1"]))

@train_evaluator.on(Events.COMPLETED)
def log_train_results():
    metrics = train_evaluator.state.metrics
    print("  Training Results - Epoch: {}  Avg accuracy: {:.2f} Avg loss: {:.2f}"
          .format(trainer.state.epoch, metrics["accuracy"], metrics["loss"]))
Here we attached log_validation_results and log_train_results handlers on Events.COMPLETED since evaluator and train_evaluator will run a single epoch over the validation datasets.
Let’s see how to add some others helpful features to our application.
- PyTorch-Ignite provides a
ProgressBarhandler to show an engine’s progression.
from ignite.contrib.handlers import ProgressBar

ProgressBar().attach(trainer, output_transform=lambda x: {'batch loss': x})
-
ModelCheckpointhandler can be used to periodically save objects which have an attributestate_dict.
from ignite.handlers import ModelCheckpoint, global_step_from_engine

# Score function to select relevant metric, here f1
def score_function(engine):
    return engine.state.metrics["f1"]

# Checkpoint to store n_saved best models wrt score function
model_checkpoint = ModelCheckpoint(
    "quick-start-mnist-output",
    n_saved=2,
    filename_prefix="best",
    score_function=score_function,
    score_name="f1",
    global_step_transform=global_step_from_engine(trainer),
)

# Save the model (if relevant) every epoch completed of evaluator
evaluator.add_event_handler(Events.COMPLETED, model_checkpoint, {"model": model})
- PyTorch-Ignite provides wrappers to modern tools to track experiments. For example,
TensorBoardLoggerhandler allows to log metric results, model’s and optimizer’s parameters, gradients, and more during the training and validation for TensorBoard.
from ignite.contrib.handlers import TensorboardLogger

# Define a Tensorboard logger
tb_logger = TensorboardLogger(log_dir="quick-start-mnist-output")

# Attach handler to plot trainer's loss every 100 iterations
tb_logger.attach_output_handler(
    trainer,
    event_name=Events.ITERATION_COMPLETED(every=100),
    tag="training",
    output_transform=lambda loss: {"batchloss": loss},
)

# Attach handler to dump evaluator's metrics every epoch completed
for tag, evaluator in [("training", train_evaluator), ("validation", evaluator)]:
    tb_logger.attach_output_handler(
        evaluator,
        event_name=Events.EPOCH_COMPLETED,
        tag=tag,
        metric_names="all",
        global_step_transform=global_step_from_engine(trainer),
    )
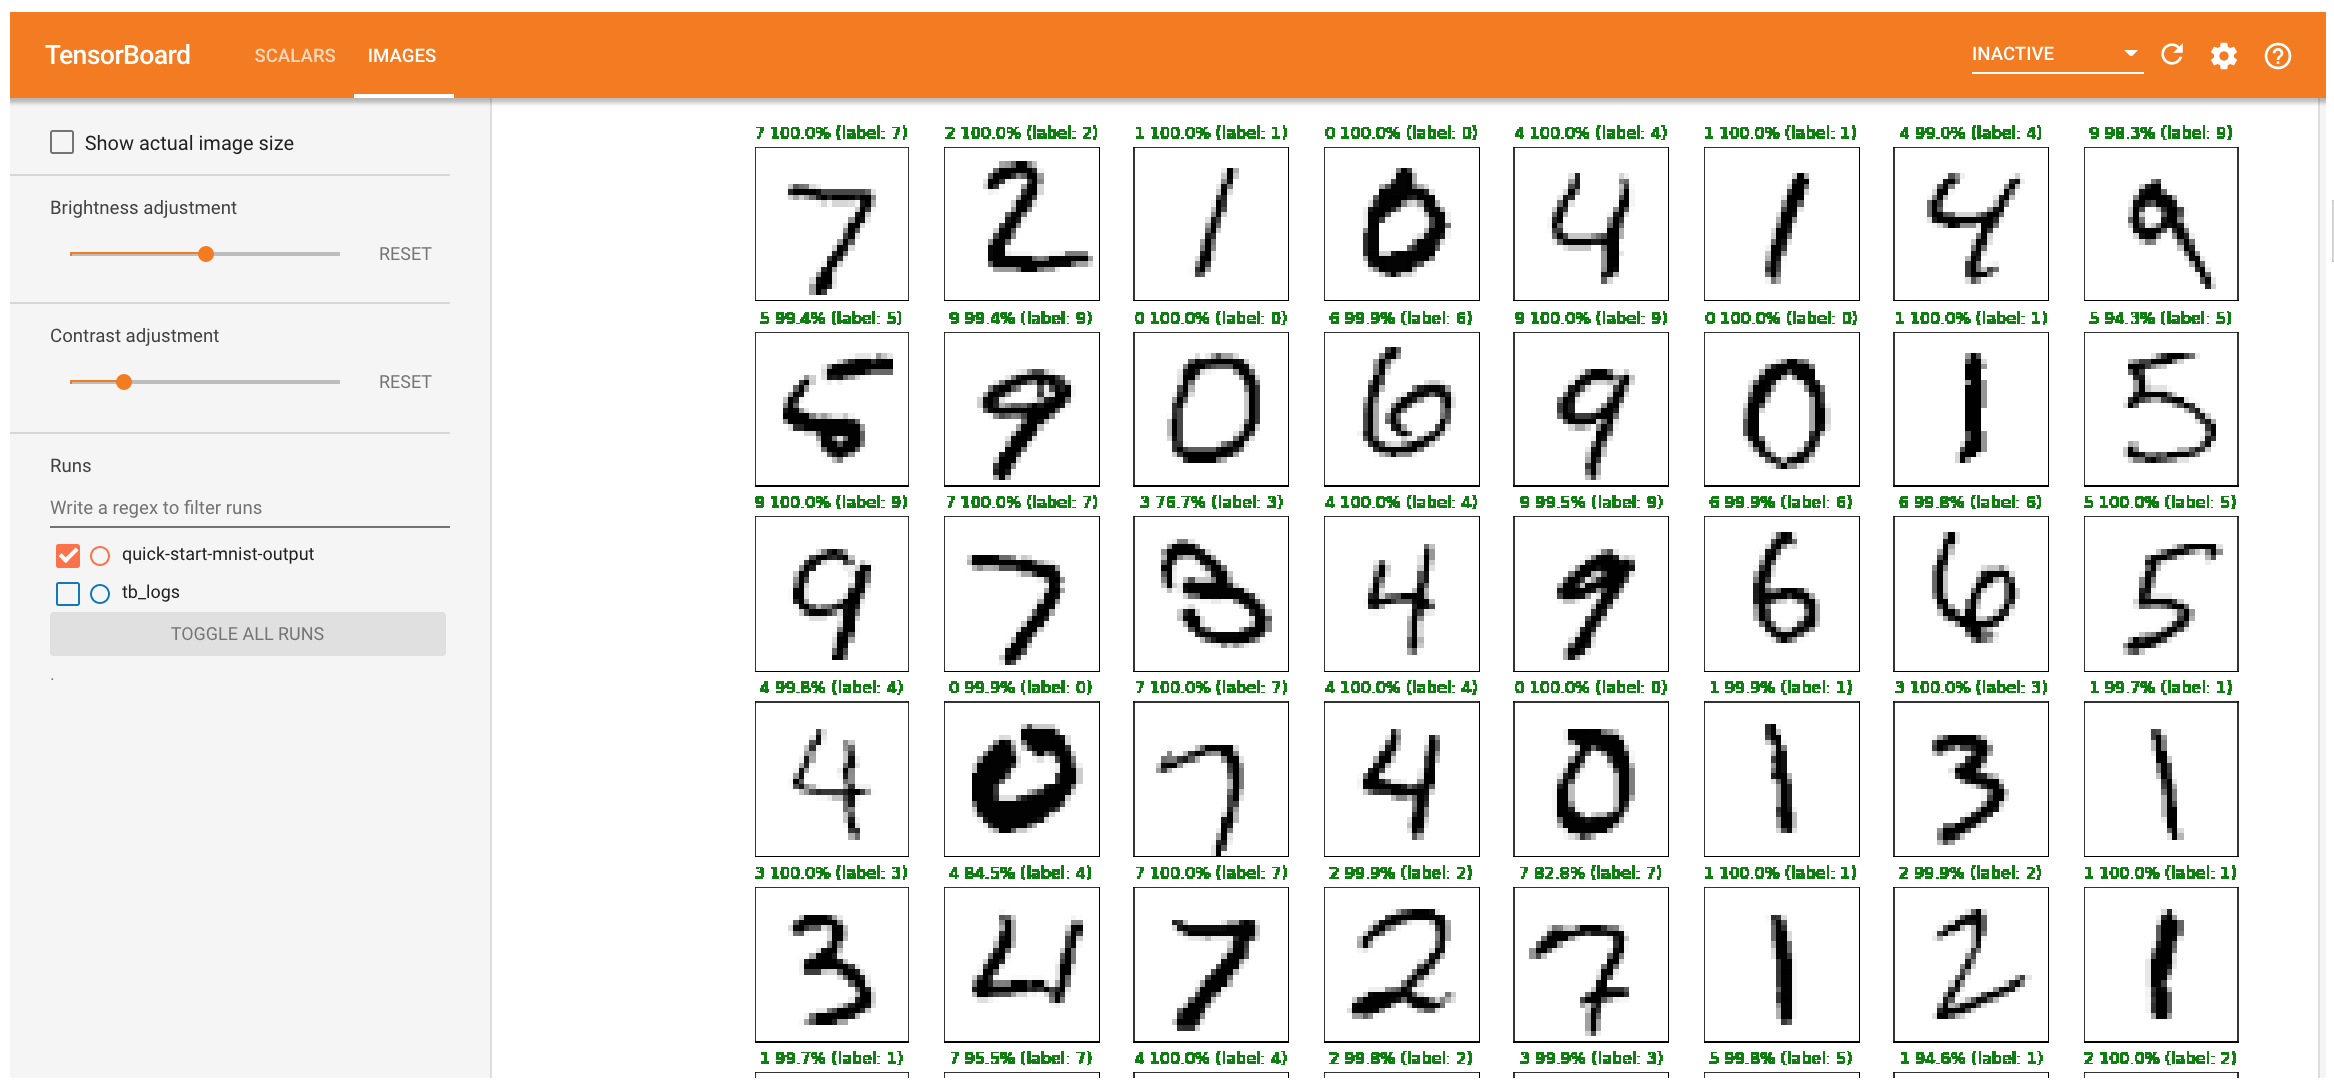
It is possible to extend the use of the TensorBoard logger very simply by integrating user-defined functions. For example, here is how to display images and predictions during training:
import matplotlib.pyplot as plt

# Store predictions and scores using matplotlib
def predictions_gt_images_handler(engine, logger, *args, **kwargs):
    x, _ = engine.state.batch
    y_pred, y = engine.state.output
    # y_pred is log softmax value
    num_x = num_y = 8
    le = num_x * num_y
    probs, preds = torch.max(torch.exp(y_pred[:le]), dim=1)
    fig = plt.figure(figsize=(20, 20))
    for idx in range(le):
        ax = fig.add_subplot(num_x, num_y, idx + 1, xticks=[], yticks=[])
        ax.imshow(x[idx].squeeze(), cmap="Greys")
        ax.set_title("{0} {1:.1f}% (label: {2})".format(
            preds[idx],
            probs[idx] * 100.0,
            y[idx]),
            color=("green" if preds[idx] == y[idx] else "red")
        )
    logger.writer.add_figure('predictions vs actuals', figure=fig, global_step=trainer.state.epoch)

# Attach custom function to evaluator at first iteration
tb_logger.attach(
    evaluator,
    log_handler=predictions_gt_images_handler,
    event_name=Events.ITERATION_COMPLETED(once=1),
)
All that is left to do now is to run the trainer on data from train_loader for a number of epochs.
trainer.run(train_loader, max_epochs=5)

# Once everything is done, let's close the logger
tb_logger.close()
Start training!

Validation Results - Epoch: 1  Avg accuracy: 0.94 Avg loss: 0.20 Avg F1: 0.94
  Training Results - Epoch: 1  Avg accuracy: 0.94 Avg loss: 0.21

Validation Results - Epoch: 2  Avg accuracy: 0.96 Avg loss: 0.12 Avg F1: 0.96
  Training Results - Epoch: 2  Avg accuracy: 0.96 Avg loss: 0.13

Validation Results - Epoch: 3  Avg accuracy: 0.97 Avg loss: 0.10 Avg F1: 0.97
  Training Results - Epoch: 3  Avg accuracy: 0.97 Avg loss: 0.10

Validation Results - Epoch: 4  Avg accuracy: 0.98 Avg loss: 0.07 Avg F1: 0.98
  Training Results - Epoch: 4  Avg accuracy: 0.97 Avg loss: 0.09

Validation Results - Epoch: 5  Avg accuracy: 0.98 Avg loss: 0.07 Avg F1: 0.98
  Training Results - Epoch: 5  Avg accuracy: 0.98 Avg loss: 0.08
Training completed!
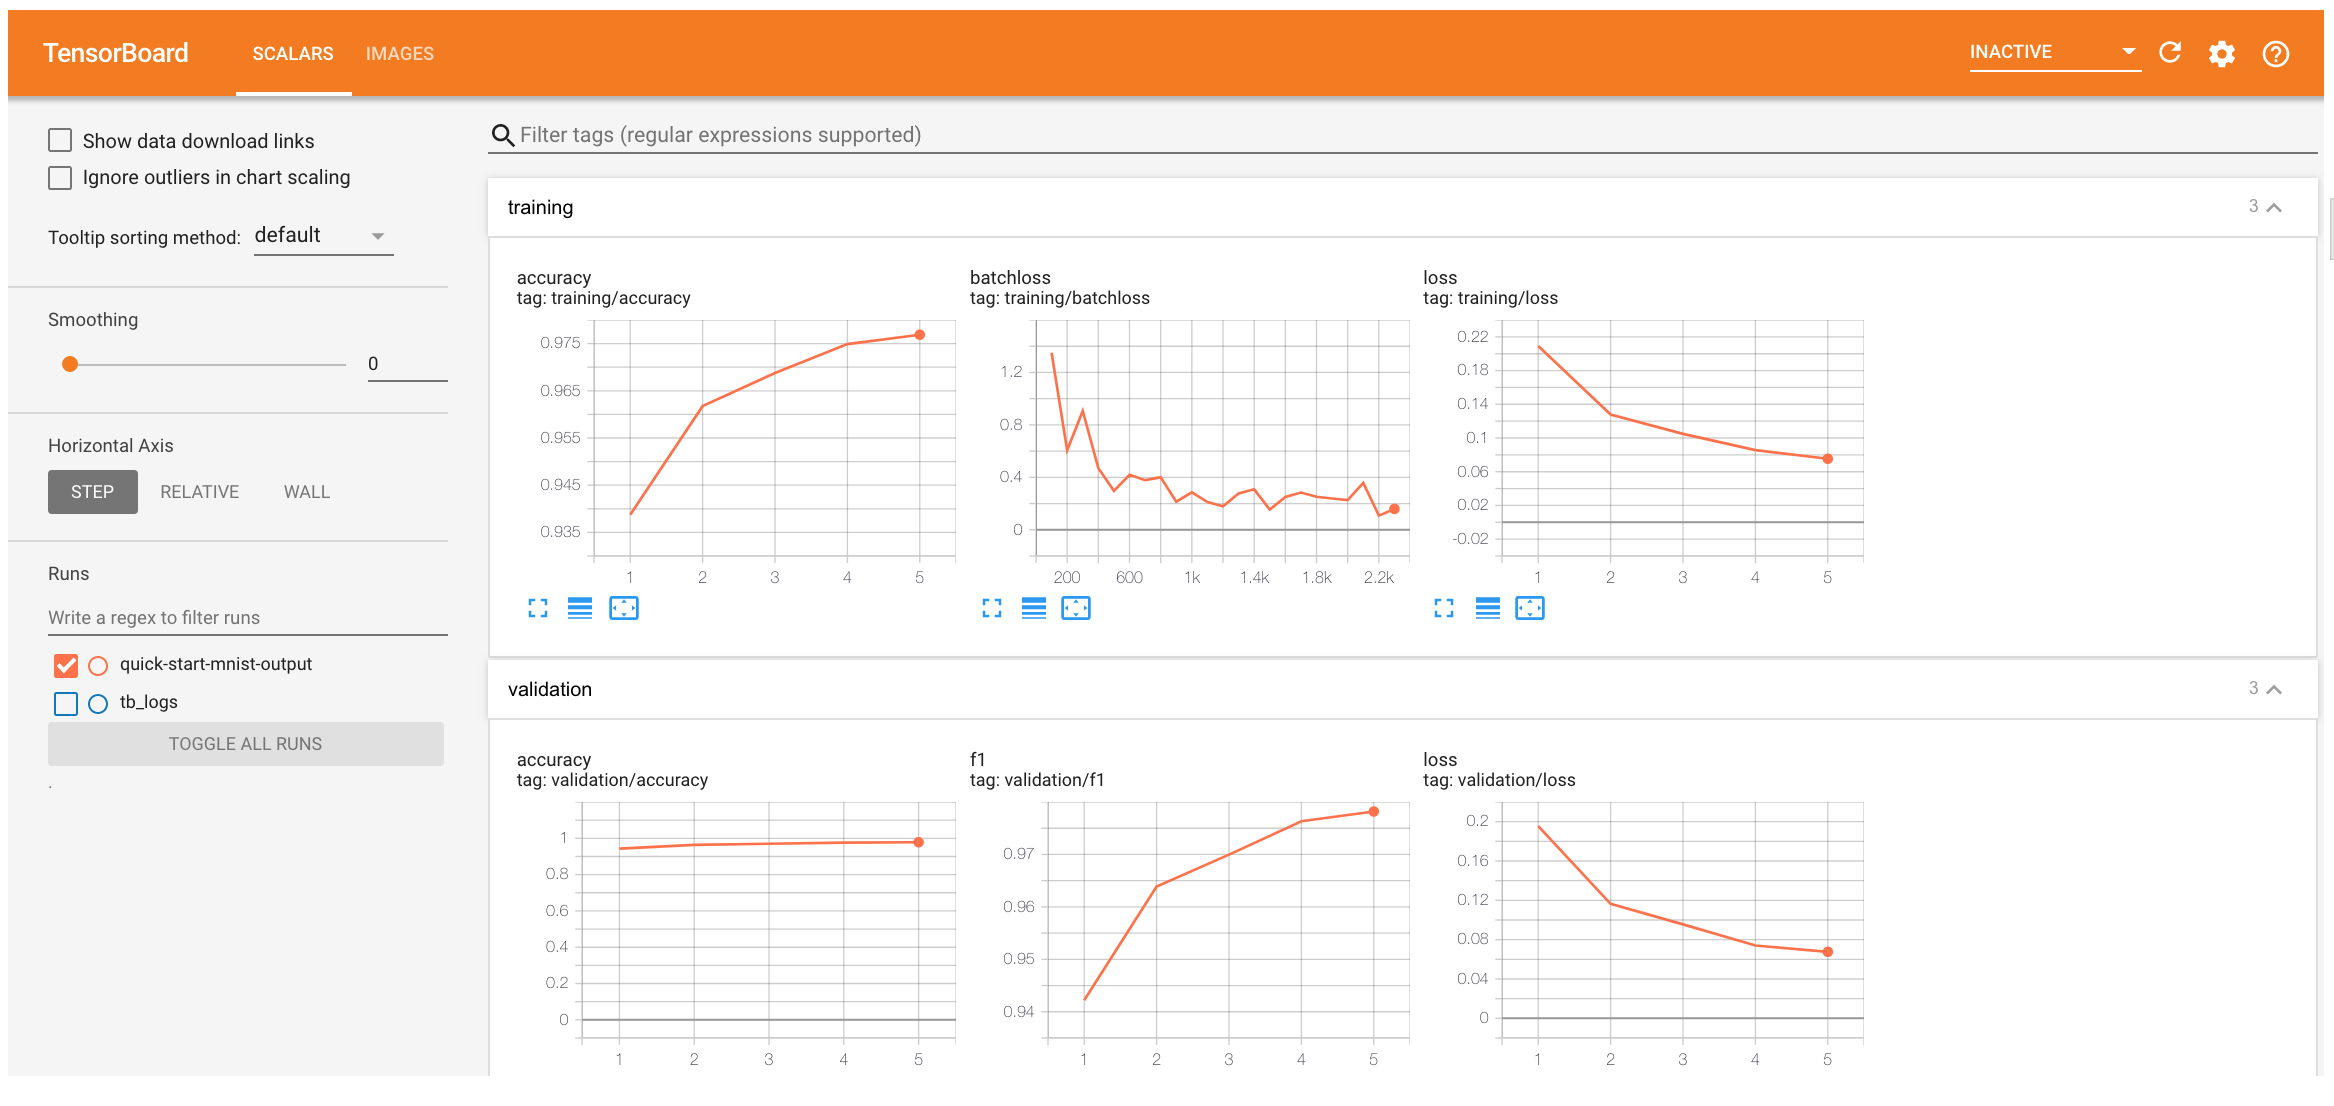
We can inspect results using tensorboard. We can observe two tabs “Scalars” and “Images”.
%load_ext tensorboard

%tensorboard --logdir=.
|
|
|---|
5 takeaways
-
Almost any training logic can be coded as a
train_stepmethod and a trainer built using this method. -
The essence of the library is the
Engineclass that loops a given number of times over a dataset and executes a processing function. -
A highly customizable event system simplifies interaction with the engine on each step of the run.
-
PyTorch-Ignite provides a set of built-in handlers and metrics for common tasks.
-
PyTorch-Ignite is easy to extend.
Advanced features
In this section we would like to present some advanced features of PyTorch-Ignite for experienced users. We will cover events, handlers and metrics in more detail, as well as distributed computations on GPUs and TPUs. Feel free to skip this section now and come back later if you are a beginner.
Power of Events & Handlers
We have seen throughout the quick-start example that events and handlers are perfect to execute any number of functions whenever you wish. In addition to that we provide several ways to extend it even more by
-
Built-in events filtering
-
Stacking events to share the action
-
Adding custom events to go beyond built-in standard events
Let’s look at these features in more detail.
Built-in events filtering
Users can simply filter out events to skip triggering the handler. Let’s create a dummy trainer:
from ignite.engine import Engine, Events

trainer = Engine(lambda e, batch: None)
Let’s consider a use-case where we would like to train a model and periodically run its validation on several development datasets, e.g. devset1 and devset2:
# We run the validation on devset1 every 5 epochs
@trainer.on(Events.EPOCH_COMPLETED(every=5))
def run_validation1():
    print("Epoch {}: Validation on devset 1".format(trainer.state.epoch))
    # evaluator.run(devset1)  # commented out for demo purposes

# We run another validation on devset2 every 10 epochs
@trainer.on(Events.EPOCH_COMPLETED(every=10))
def run_validation2():
    print("Epoch {}: Validation on devset 2".format(trainer.state.epoch))
    # evaluator.run(devset2)  # commented out for demo purposes

train_data = [0, 1, 2, 3, 4]
trainer.run(train_data, max_epochs=50)
Epoch 5: Validation on devset 1
Epoch 10: Validation on devset 1
Epoch 10: Validation on devset 2
Epoch 15: Validation on devset 1
Epoch 20: Validation on devset 1
Epoch 20: Validation on devset 2
Epoch 25: Validation on devset 1
Epoch 30: Validation on devset 1
Epoch 30: Validation on devset 2
Epoch 35: Validation on devset 1
Epoch 40: Validation on devset 1
Epoch 40: Validation on devset 2
Epoch 45: Validation on devset 1
Epoch 50: Validation on devset 1
Epoch 50: Validation on devset 2
Let’s now consider another situation where we would like to make a single change once we reach a certain epoch or iteration. For example, let’s change the training dataset on the 5-th epoch from low resolution images to high resolution images:
def train_step(e, batch):
    print("Epoch {} - {} : batch={}".format(e.state.epoch, e.state.iteration, batch))

trainer = Engine(train_step)

small_res_data = [0, 1, 2, ]
high_res_data = [10, 11, 12]

# We run the following handler once on 5-th epoch started
@trainer.on(Events.EPOCH_STARTED(once=5))
def change_train_dataset():
    print("Epoch {}: Change training dataset".format(trainer.state.epoch))
    trainer.set_data(high_res_data)

trainer.run(small_res_data, max_epochs=10)
Epoch 1 - 1 : batch=0
Epoch 1 - 2 : batch=1
Epoch 1 - 3 : batch=2
Epoch 2 - 4 : batch=0
Epoch 2 - 5 : batch=1
Epoch 2 - 6 : batch=2
Epoch 3 - 7 : batch=0
Epoch 3 - 8 : batch=1
Epoch 3 - 9 : batch=2
Epoch 4 - 10 : batch=0
Epoch 4 - 11 : batch=1
Epoch 4 - 12 : batch=2
Epoch 5: Change training dataset
Epoch 5 - 13 : batch=10
Epoch 5 - 14 : batch=11
Epoch 5 - 15 : batch=12
Epoch 6 - 16 : batch=10
Epoch 6 - 17 : batch=11
Epoch 6 - 18 : batch=12
Epoch 7 - 19 : batch=10
Epoch 7 - 20 : batch=11
Epoch 7 - 21 : batch=12
Epoch 8 - 22 : batch=10
Epoch 8 - 23 : batch=11
Epoch 8 - 24 : batch=12
Epoch 9 - 25 : batch=10
Epoch 9 - 26 : batch=11
Epoch 9 - 27 : batch=12
Epoch 10 - 28 : batch=10
Epoch 10 - 29 : batch=11
Epoch 10 - 30 : batch=12
Let’s now consider another situation where we would like to trigger a handler with completely custom logic. For example, we would like to dump model gradients if the training loss satisfies a certain condition:
# Let's predefine for simplicity training losses
train_losses = [2.0, 1.9, 1.7, 1.5, 1.6, 1.2, 0.9, 0.8, 1.0, 0.8, 0.7, 0.4, 0.2, 0.1, 0.1, 0.01]

trainer = Engine(lambda e, batch: train_losses[e.state.iteration - 1])

# We define our custom logic when to execute a handler
def custom_event_filter(trainer, event):
    if 0.1 < trainer.state.output < 1.0:
        return True
    return False

# We run the following handler every iteration completed under our custom_event_filter condition:
@trainer.on(Events.ITERATION_COMPLETED(event_filter=custom_event_filter))
def dump_model_grads():
    print("{} - loss={}: dump model grads".format(trainer.state.iteration, trainer.state.output))

train_data = [0, ]
trainer.run(train_data, max_epochs=len(train_losses))
7 - loss=0.9: dump model grads
8 - loss=0.8: dump model grads
10 - loss=0.8: dump model grads
11 - loss=0.7: dump model grads
12 - loss=0.4: dump model grads
13 - loss=0.2: dump model grads
Stack events to share the action
A user can trigger the same handler on events of differen types. For example, let’s run a handler for model’s validation every 3 epochs and when the training is completed:
trainer = Engine(lambda e, batch: None)

@trainer.on(Events.EPOCH_COMPLETED(every=3) | Events.COMPLETED)
def run_validation():
    print("Epoch {} - event={}: Validation".format(trainer.state.epoch, trainer.last_event_name))
    # evaluator.run(devset)

train_data = [0, 1, 2, 3, 4]
trainer.run(train_data, max_epochs=20)
Epoch 3 - event=epoch_completed: Validation
Epoch 6 - event=epoch_completed: Validation
Epoch 9 - event=epoch_completed: Validation
Epoch 12 - event=epoch_completed: Validation
Epoch 15 - event=epoch_completed: Validation
Epoch 18 - event=epoch_completed: Validation
Epoch 20 - event=completed: Validation
Add custom events
A user can add their own events to go beyond built-in standard events. For example, let’s define new events related to backward and optimizer step calls. This can help us to attach specific handlers on these events in a configurable manner.
from ignite.engine import EventEnum


class BackpropEvents(EventEnum):
    BACKWARD_STARTED = 'backward_started'
    BACKWARD_COMPLETED = 'backward_completed'
    OPTIM_STEP_COMPLETED = 'optim_step_completed'


def update(engine, batch):
    # ...
    # loss = criterion(y_pred, y)
    engine.fire_event(BackpropEvents.BACKWARD_STARTED)
    # loss.backward()
    engine.fire_event(BackpropEvents.BACKWARD_COMPLETED)
    # optimizer.step()
    engine.fire_event(BackpropEvents.OPTIM_STEP_COMPLETED)
    # ...

trainer = Engine(update)
trainer.register_events(*BackpropEvents)

def function_before_backprop():
    print("{} - before backprop".format(trainer.state.iteration))

trainer.add_event_handler(BackpropEvents.BACKWARD_STARTED, function_before_backprop)

def function_after_backprop():
    print("{} - after backprop".format(trainer.state.iteration))

trainer.add_event_handler(BackpropEvents.BACKWARD_COMPLETED, function_after_backprop)

train_data = [0, 1, 2, 3, 4]
trainer.run(train_data, max_epochs=2)
1 - before backprop
1 - after backprop
2 - before backprop
2 - after backprop
3 - before backprop
3 - after backprop
4 - before backprop
4 - after backprop
5 - before backprop
5 - after backprop
6 - before backprop
6 - after backprop
7 - before backprop
7 - after backprop
8 - before backprop
8 - after backprop
9 - before backprop
9 - after backprop
10 - before backprop
10 - after backprop
Out-of-the-box metrics
PyTorch-Ignite provides an ensemble of metrics dedicated to many Deep Learning tasks (classification, regression, segmentation, etc.). Most of these metrics provide a way to compute various quantities of interest in an online fashion without having to store the entire output history of a model.
- For classification :
Precision,Recall,Accuracy,ConfusionMatrixand more! - For segmentation :
DiceCoefficient,IoU,mIOUand more! - ~20 regression metrics, e.g. MSE, MAE, MedianAbsoluteError, etc
- Metrics that store the entire output history per epoch
- Possible to use with
scikit-learnmetrics, e.g.EpochMetric,AveragePrecision,ROC_AUC, etc
- Possible to use with
- Easily composable to assemble a custom metric
- Easily extendable to create custom metrics
Complete lists of metrics provided by PyTorch-Ignite can be found
here for ignite.metrics and
here for ignite.contrib.metrics.
Two kinds of public APIs are provided:
- metric is attached to
Engine - metric’s
reset,update,computemethods
More on the reset, update, compute public API
Let’s demonstrate this API on a simple example using the Accuracy metric. The idea behind this API is that we accumulate internally certain counters on each update call. The metric’s value is computed on each compute call and counters are reset on each reset call.
import torch
from ignite.metrics import Accuracy

acc = Accuracy()

# Start accumulation
acc.reset()

y_target = torch.tensor([0, 1, 2, 1,])
# y_pred is logits computed by the model
y_pred = torch.tensor([
    [10.0, 0.1, -1.0],  # correct
    [2.0, -1.0, -2.0],  # incorrect
    [1.0, -1.0, 4.0],   # correct
    [0.0, 5.0, -1.0],   # correct
])
acc.update((y_pred, y_target))

# Compute accuracy on 4 samples
print("After 1st update, accuracy=", acc.compute())

y_target = torch.tensor([1, 2, 0, 2])
# y_pred is logits computed by the model
y_pred = torch.tensor([
    [2.0, 1.0, -1.0],   # incorrect
    [0.0, 1.0, -2.0],   # incorrect
    [2.6, 1.0, -4.0],   # correct
    [1.0, -3.0, 2.0],   # correct
])
acc.update((y_pred, y_target))

# Compute accuracy on 8 samples
print("After 2nd update, accuracy=", acc.compute())
After 1st update, accuracy= 0.75
After 2nd update, accuracy= 0.625
Composable metrics
Users can compose their own metrics with ease from existing ones using arithmetic operations or PyTorch methods. For example, an error metric defined as 100 * (1.0 - accuracy) can be coded in a straightforward manner:
import torch
from ignite.metrics import Accuracy

acc = Accuracy()
error = 100.0 * (1.0 - acc)

# Start accumulation
acc.reset()

y_target = torch.tensor([0, 1, 2, 1,])
# y_pred is logits computed by the model
y_pred = torch.tensor([
    [10.0, 0.1, -1.0],  # correct
    [2.0, -1.0, -2.0],  # incorrect
    [1.0, -1.0, 4.0],   # correct
    [0.0, 5.0, -1.0],   # correct
])
acc.update((y_pred, y_target))

# Compute error on 4 samples
print("After 1st update, error=", error.compute())

y_target = torch.tensor([1, 2, 0, 2])
# y_pred is logits computed by the model
y_pred = torch.tensor([
    [2.0, 1.0, -1.0],   # incorrect
    [0.0, 1.0, -2.0],   # incorrect
    [2.6, 1.0, -4.0],   # correct
    [1.0, -3.0, 2.0],   # correct
])
acc.update((y_pred, y_target))

# Compute err on 8 samples
print("After 2nd update, error=", error.compute())
After 1st update, error= 25.0
After 2nd update, error= 37.5
In case a custom metric can not be expressed as arithmetic operations of base metrics, please follow this guide to implement the custom metric.
Out-of-the-box handlers
PyTorch-Ignite provides various commonly used handlers to simplify application code:
- Common training handlers:
Checkpoint,EarlyStopping,Timer,TerminateOnNan - Optimizer’s parameter scheduling (learning rate, momentum, etc.)
- concatenate schedulers, add warm-up, cyclical scheduling, piecewise-linear scheduling, and more! See examples.
- Time profiling
- Logging to experiment tracking systems:
- Tensorboard, Visdom, MLflow, Polyaxon, Neptune, Trains, etc.
Complete lists of handlers provided by PyTorch-Ignite can be found
here for ignite.handlers and
here for ignite.contrib.handlers.
Common training handlers
With the out-of-the-box
Checkpoint handler, a user can easily save the training state or best models to the filesystem or a cloud.
EarlyStopping and
TerminateOnNan helps to stop the training if overfitting or diverging.
All those things can be easily added to the trainer one by one or with helper methods.
Let’s consider an example of using helper methods.
import torch
import torch.nn as nn
import torch.optim as optim

from ignite.engine import create_supervised_trainer, create_supervised_evaluator, Events
from ignite.metrics import Accuracy
import ignite.contrib.engines.common as common

train_data = [[torch.rand(2, 4), torch.randint(0, 5, size=(2, ))] for _ in range(10)]
val_data = [[torch.rand(2, 4), torch.randint(0, 5, size=(2, ))] for _ in range(10)]
epoch_length = len(train_data)

model = nn.Linear(4, 5)
optimizer = optim.SGD(model.parameters(), lr=0.01)
# step_size is expressed in iterations
lr_scheduler = optim.lr_scheduler.StepLR(optimizer, step_size=epoch_length, gamma=0.88)

# Let's define some dummy trainer and evaluator
trainer = create_supervised_trainer(model, optimizer, nn.CrossEntropyLoss())
evaluator = create_supervised_evaluator(model, metrics={"accuracy": Accuracy()})


@trainer.on(Events.EPOCH_COMPLETED)
def run_validation():
    evaluator.run(val_data)

# training state to save
to_save = {
    "trainer": trainer, "model": model,
    "optimizer": optimizer, "lr_scheduler": lr_scheduler
}
metric_names = ["batch loss", ]

common.setup_common_training_handlers(
    trainer=trainer,
    to_save=to_save,
    output_path="checkpoints",
    save_every_iters=epoch_length,
    lr_scheduler=lr_scheduler,
    output_names=metric_names,
    with_pbars=True,
)

tb_logger = common.setup_tb_logging("tb_logs", trainer, optimizer, evaluators=evaluator)

common.save_best_model_by_val_score(
    "best_models",
    evaluator=evaluator,
    model=model,
    metric_name="accuracy",
    n_saved=2,
    trainer=trainer,
    tag="val",
)

trainer.run(train_data, max_epochs=5)

tb_logger.close()
HBox(children=(FloatProgress(value=0.0, max=5.0), HTML(value='')))
ls -all "checkpoints"
ls -all "best_models"
ls -all "tb_logs"
total 12
drwxr-xr-x 2 root root 4096 Aug 31 11:27 .
drwxr-xr-x 1 root root 4096 Aug 31 11:27 ..
-rw------- 1 root root 1657 Aug 31 11:27 training_checkpoint_50.pt
total 16
drwxr-xr-x 2 root root 4096 Aug 31 11:27  .
drwxr-xr-x 1 root root 4096 Aug 31 11:27  ..
-rw------- 1 root root 1145 Aug 31 11:27 'best_model_2_val_accuracy=0.3000.pt'
-rw------- 1 root root 1145 Aug 31 11:27 'best_model_3_val_accuracy=0.3000.pt'
total 12
drwxr-xr-x 2 root root 4096 Aug 31 11:27 .
drwxr-xr-x 1 root root 4096 Aug 31 11:27 ..
-rw-r--r-- 1 root root  325 Aug 31 11:27 events.out.tfevents.1598873224.3aa7adc24d3d.115.1
In the above code, the common.setup_common_training_handlers method adds TerminateOnNan, adds a handler to use lr_scheduler (expressed in iterations), adds training state checkpointing, exposes batch loss output as exponential moving averaged metric for logging, and adds a progress bar to the trainer.
Next, the common.setup_tb_logging method returns a TensorBoard logger which is automatically configured to log trainer’s metrics (i.e. batch loss), optimizer’s learning rate and evaluator’s metrics.
Finally, common.save_best_model_by_val_score sets up a handler to save the best two models according to the validation accuracy metric.
Distributed and XLA device support
PyTorch offers a distributed communication package for writing and running parallel applications on multiple devices and machines.
The native interface provides commonly used collective operations and allows to address multi-CPU and multi-GPU computations seamlessly using the
torch DistributedDataParallel module and the well-known mpi, gloo and nccl backends.
Recently, users can also run PyTorch on XLA devices, like TPUs, with the torch_xla package.
However, writing distributed training code working on GPUs and TPUs is not a trivial task due to some API specificities.
The purpose of the PyTorch-Ignite ignite.distributed package introduced in version 0.4 is to unify the code for native torch.distributed API, torch_xla API on XLA devices and also supporting other distributed frameworks (e.g. Horovod).
To make distributed configuration setup easier, the
Parallel context manager has been introduced:
import ignite.distributed as idist

def training(local_rank, config, **kwargs):
    print(idist.get_rank(), ': run with config:', config, '- backend=', idist.backend())
    # do the training ...

backend = 'gloo' # or "nccl" or "xla-tpu"
dist_configs = {'nproc_per_node': 2}
# dist_configs["start_method"] = "fork"  # If using Jupyter Notebook
config = {'c': 12345}

with idist.Parallel(backend=backend, **dist_configs) as parallel:
    parallel.run(training, config, a=1, b=2)
2020-08-31 11:27:07,128 ignite.distributed.launcher.Parallel INFO: Initialized distributed launcher with backend: 'gloo'
2020-08-31 11:27:07,128 ignite.distributed.launcher.Parallel INFO: - Parameters to spawn processes:
	nproc_per_node: 2
	nnodes: 1
	node_rank: 0
2020-08-31 11:27:07,128 ignite.distributed.launcher.Parallel INFO: Spawn function '<function training at 0x7f32b8ac9d08>' in 2 processes
0 : run with config: {'c': 12345} - backend= gloo
1 : run with config: {'c': 12345} - backend= gloo
2020-08-31 11:27:09,959 ignite.distributed.launcher.Parallel INFO: End of run
The above code with a single modification can run on a GPU, single-node multiple GPUs, single or multiple TPUs etc. It can be executed with the torchrun or by Python and spawning the required number of processes. For more details, see
the documentation.
In addition, methods like auto_model(), auto_optim() and auto_dataloader() help to adapt in a transparent way the provided model, optimizer and data loaders to an existing configuration:
# main.py

import ignite.distributed as idist

def training(local_rank, config, **kwargs):

    print(idist.get_rank(), ": run with config:", config, "- backend=", idist.backend())

    train_loader = idist.auto_dataloader(dataset, batch_size=32, num_workers=12, shuffle=True, **kwargs)
    # batch size, num_workers and sampler are automatically adapted to existing configuration
    # ...
    model = resnet50()
    optimizer = optim.SGD(model.parameters(), lr=0.01)

    # if training with Nvidia/Apex for Automatic Mixed Precision (AMP)
    # model, optimizer = amp.initialize(model, optimizer, opt_level=opt_level)

    model = idist.auto_model(model)
    # model is DDP or DP or just itself according to existing configuration
    # ...
    optimizer = idist.auto_optim(optimizer)
    # optimizer is itself, except XLA configuration and overrides `step()` method.
    # User can safely call `optimizer.step()` (behind `xm.optimizer_step(optimizier)` is performed)

backend = "nccl"  # torch native distributed configuration on multiple GPUs
# backend = "xla-tpu"  # XLA TPUs distributed configuration
# backend = None  # no distributed configuration
with idist.Parallel(backend=backend, **dist_configs) as parallel:
    parallel.run(training, config, a=1, b=2)
Please note that these auto_* methods are optional; a user is free use some of them and manually set up certain parts of the code if required. The advantage of this approach is that there is no under the hood inevitable objects' patching and overriding.
More details about distributed helpers provided by PyTorch-Ignite can be found in the documentation. A complete example of training on CIFAR10 can be found here.
A detailed tutorial with distributed helpers is published here.
Projects using PyTorch-Ignite
There is a list of research papers with code, blog articles, tutorials, toolkits and other projects that are using PyTorch-Ignite. A detailed overview can be found here.
To start your project using PyTorch-Ignite is simple and can require only to pass through this quick-start example and library “Concepts”.
In addition, PyTorch-Ignite also provides several tutorials:
- Text Classification using Convolutional Neural Networks
- Variational Auto Encoders
- Convolutional Neural Networks for Classifying Fashion-MNIST Dataset
- Training Cycle-GAN on Horses to Zebras with Nvidia/Apex
- Another training Cycle-GAN on Horses to Zebras with Native Torch CUDA AMP
- Finetuning EfficientNet-B0 on CIFAR100
- Hyperparameters tuning with Ax
- Basic example of LR finder on MNIST
- Benchmark mixed precision training on Cifar100: torch.cuda.amp vs nvidia/apex
- MNIST training on a single TPU
- CIFAR10 Training on multiple TPUs
and examples:
- cifar10 (single/multi-GPU, DDP, AMP, TPUs)
- basic RL
-
reproducible baselines for vision tasks:
- classification on ImageNet (single/multi-GPU, DDP, AMP)
- semantic segmentation on Pascal VOC2012 (single/multi-GPU, DDP, AMP)
The package can be installed with pip or conda. More info and guides can be found here.